
“Wow! This machine is so cool! “I exclaimed this with excitement the first time I saw a 3D printer. It was about a year ago, and I was chaperoning my son, along with a group of other kids from his school, on a field trip to the Museum of Flight in Seattle. For a moment, I totally forgot where I was and who was with me. I stood in front of the machine as it was building up a 3D object, layer by layer, and I was fascinated, as the kids were. I could not look away from it.
During the trip back to school, I couldn’t stop thinking about the machine. I wanted to make something by using the 3D printer, but many questions came to mind. What type of object would it be possible for me to make? How could I design it? Could I have something made to order? Using Google on my iPad ©, I was able to find most of these answers. The only answer I was missing was: what should I actually make? I wanted to make an everyday, useful object – but what?
What I Decided to Make: One day, I was in a store, looking for a tray to put by my kitchen sink where I could keep together several bottles of dish soaps and lotions, along with a dish sponge. I realized that I had been looking for something like this for over 3 years, but I had not been able to find exactly what I needed. I already had a tray at that time, but standing water would stay in it and if I didn’t wash it out every day, it would start to smell bad. Furthermore, I couldn’t stand how the water always overflowed from the tray and would make puddles everywhere behind the kitchen sink. I didn’t like the colors, shapes, or materials of any of the trays I would find in the stores I visited. So, I decided that I would use a 3D printer to create the perfect tray for me!
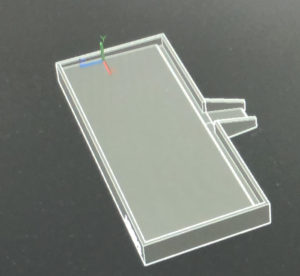
How I Designed It: Now that I knew what I wanted to make, the next step was designing it. I started with just a piece of paper, where I made a rough sketch to get my thoughts into shape. I wanted the size of the tray to be 6 by 10 inches, with a simple rectilinear shape, no curves, and no legs. I wanted the surface to be slightly sloped, so that water would not remain on it, plus a spout help drain the water out.
Then, I started to draw the shape on the computer. As I am an architect who makes 3D models of buildings using computers, it was not difficult for me to work up a simple tray, even though it had a number of small details I needed to include in the design. My only concern was that the file type I was using, which was CAD, might not be accepted by the 3D printing company I would eventually choose to create the tray. However, this was not a deal-breaker because I can usually find a website to convert to any file type I need. So,after I finished the 3D model of the tray in CAD, I set out to find the right 3D printing company to build it.
How I Ordered form the 3D Printing Company: I decided to go with a company called Shapeways. Their website was very organized, and they provided very good customer service. They also had a nice forum site that explained how to change the settings of the CAD file to get smooth model when you exported the file. So, I followed their instructions and I uploaded the file. It turned out to be very quick and easy – 1,2,3, done!
But then I saw the price quote. It was sooooo expensive! I hadn’t imagined at all that something made of just plastic would be that expensive! All the plastic items I see everywhere in the stores are really cheap. Are they cheap only because it’s cheap to make things in China? I sent the file to other 3D printing companies, but the prices they quoted me were even more expensive!
After much more research, the conclusion I reached was that the particular type of plastics used for 3D printing are, in fact, rather expensive. I began to think that maybe I should have decided to make it tiny instead.
I wondered, “Should I give up? Should I make something else?” But I really needed the tray – and I really didn’t want to see the stale water sitting in that old tray every day.
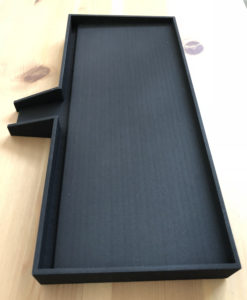
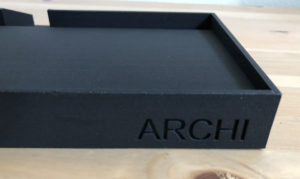
How I Modified the Item to Reduce its Cost: I eventually decided to reduce the amount of the material needed to make the tray. If the tray were thinner and hollow, it would use less material, and therefore, it would cost less to produce. I made these modifications to the 3D model. When I uploaded the file, the price that came up was still expensive, but acceptable. At that point, I almost placed the order, but then I thought it would be nice to put my company’s name on the tray, too. I went back to the design and had the name engraved on the side of the tray. This did not change the price. I was satisfied then, and hit “the order”button.
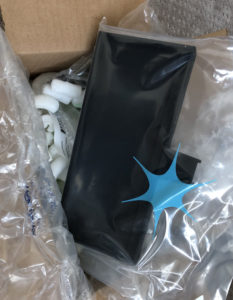
How it Looks: The package with my order arrived about a week later. I was very excited to open it. It was packed very nicely. When I took the tray out of its plastic bag, I was amazed to see how nice it looked. Actually I hadn’t expected a very high-quality item, but it has surpassed my expectations. You cannot tell that it made of plastic. The tray is so beautiful and perfect; I love it!
I always like to learn how to use new technology. Making the tray with 3D printer was very fun project for me, even with its challenges. It is amazing that you can create what you really want. It is not difficult to do. You don’t need much technical knowledge. I used CAD, but you can use other software to create the designs, and there are many ways to convert the file to be compatible with the 3D printer. You can find many websites explaining more about the process. Just remember, the plastic used in 3D printer is not cheap, so I suggest you start with a small item. Good luck!